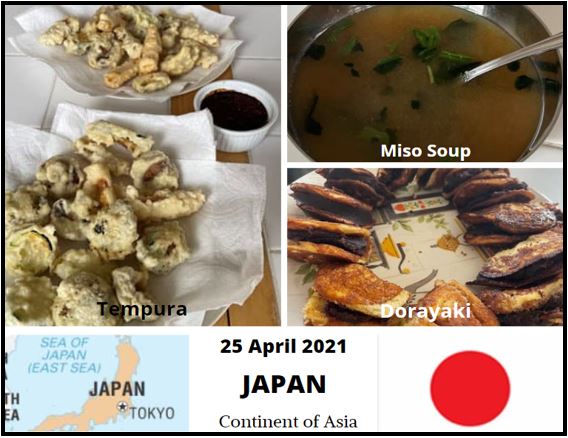
Japan is located in the continent of Asia. It has the Pacific Ocean to the north, east and south, Taiwan and China to the far southwest, South Korea and the Sea of Japan (East Sea) to the west.
The capital is Tokyo.
There is no official language, but Japanese is the national language.
The “climate is characterized as monsoonal and has numerous climatic variations due to its features. September to late March are the high pressure and cold air. From mid-April to early September, they have warmer temperatures. The staples are rice, noodles, fish, seafood, chicken, beef, soybeans and bread (https://www.angloinfo.com/how-to/japan/lifestyle/food-drink/staple-foods).
https://www.britannica.com/place/Japan
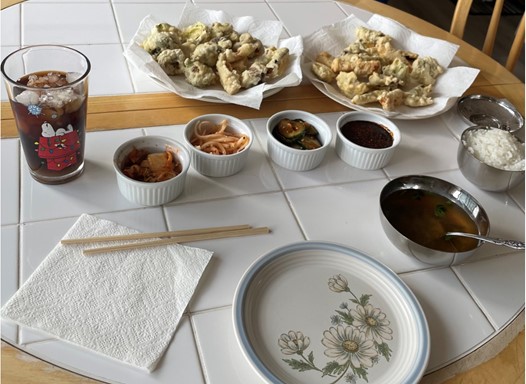
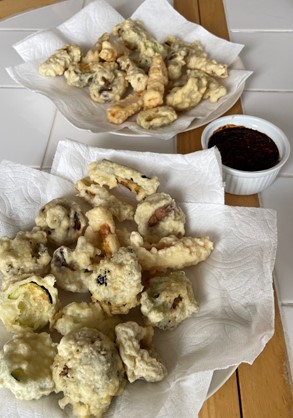
TEMPURA (https://www.thespruceeats.com/tempura-batter-recipe-2031529):
- 1 C all-purpose flour
- 1 cold large egg
- 1 C iced water
- In a small bowl, sift the flour once or twice to remove any clumps and to make it light and soft. Set aside.
- In a separate medium bowl, gently beat egg until the yolk and egg whites are just barely incorporated.
- Combine the iced water and add it to the bowl with the beaten egg.
- Add the sifted flour into the bowl with the egg and water mixture and lightly combine the flour using chopsticks. Be careful not to overmix the batter; it should be a little lumpy.
How to use:
- First, lightly coat the seafood or vegetable in either cake flour, Wondra flour, or all-purpose flour before dipping them into the tempura batter. This allows the batter to adhere better.
- Once coated, dip your items into the better gently. Too much batter runs the risk of crispy exterior and mushy interior.
- When ready to fry, make sure that your frying oil is between 340F and 360F. Any higher and it will be too crispy. Any lower and the tempura will absorb too much oil and won’t be crispy enough.
- Once fried, serve immediately with a dipping sauce and dig in. Tempura can get mushy if it sits too long.
- If for some reason the batter won’t be used right away, place it in the refrigerator temporarily (for a few short minutes) to keep it ice cold until you’re ready to deep-fry your tempura. Don not store in the fridge for an extended period of time.
Tips:
- Prepare all the ingredients you plan to deep-fry prior to mixing the batter ingredients.
- Always sift the flour. This makes the flour lighter and easier to incorporate into the batter when it’s mixed.
- For crisp tempura, use ice water instead of room-temperature or tap water.
- Instead of a whisk, use chopsticks to mix the tempura batter ingredients. This minimizes the amount of air in the batter and lessens the risk of overmixing.
- Heat the oil for deep-frying before the tempura batter is prepared to ensure the batter is at its coldest when it hits the oil and that the oil is ready for frying.
- While frying, do not place the bowl of batter on the hot stove or it will get too hot.
- Don’t prepare the tempura batter ahead of time, as it will not yield the best results.
Food for Tempura:
- ½ C medium to small mushrooms, whole
- ½ C sweet potato, peeled and sliced like a French fry
- ½ C broccoli florets
- ½ C eggplant, sliced either in ¼” slices, or cut in French fry style
- ½ C zucchini
Dipping sauce (https://www.thespruceeats.com/tempura-dipping-sauce-2031533):
- 1 C dashi soup stock (2 C cold water, 2” square piece kombu, ½ C dry bonito flakes, packed)
- ¼ C mirin
- ¼ C soy sauce
- ½ TBSP sugar
- Grated daikon (optional)
Making the dashi soup stock:
- Place the cold water in a small saucepan and add the kombu. Bring to a simmer and continue to cook for 5 to 7 minutes until tender. You should be able to pinch through the kombu with your thumbnail.
- Turn off the heat and remove and discard the kombu. Add the bonito flakes and let steep for 10 to 15 minutes. The bonito will sink when the broth is ready.
- Strain the brough through a mesh strainer and press the bonito with a ladle or the back of a spoon to extract as much liquid as possible. Discard the bonito.
- The dashi is ready to use in the sauce. This recipe yields approximately 1-1/2 C, so you will have extra.
Make the Tempura Dipping Sauce:
- Add the dashi, mirin, soy sauce, and sugar to a saucepan and mix well.
- Bring to a boil over medium heat. Turn off the heat and let it cool.
- Serve the tensuyu in individual small bowls alongside the tempura, adding some grated daikon on top of the sauce or alongside if you like.
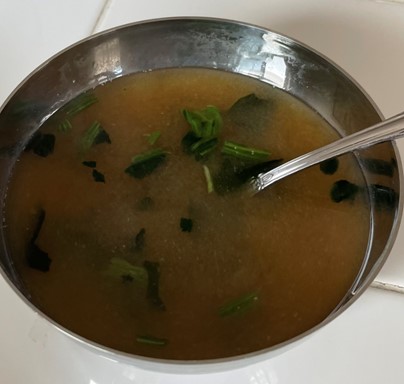
BASIC VEGETARIAN MISO SOUP (https://www.thespruceeats.com/basic-miso-soup-3377886):
- 4 C water
- 1 TBSP nori (or wakame seaweed, shredded)
- 1/3 C miso
- 3 green onions (a.k.a. scallions, chopped)
- ½ block firm silken tofu (cut into 1” cubes)
- Dash soy sauce (optional)
- Bring water to a slow simmer and add seaweed. Allow the seaweed to simmer for at least 5 to 6 minutes.
- Reduce heat to very low and add the rest of the ingredients. Stir until miso is well dissolved. It’s best not to boil the miso, as this will ruin some of its healthy properties as well as change the flavor of the soup.
- That’s it! Making miso soup is so easy because the fantastic flavor from the miso does all the work for you.
- Enjoy your vegetarian and vegan miso soup.
Note: If you are pressed for time, or cannot find all of the ingredients, you can look at purchasing a already prepared miso soup packet from the store or Amazon.
DORAYAKI (Japanese Red Bean Pancake) (https://www.justonecookbook.com/dorayaki-japanese-red-bean-pancake/):
- 4 large eggs
- 2/3 C + 12 TBSP sugar
- 2 TBSP honey
- 1-1/3 C all-purpose flour
- 1 tsp baking powder
- 1-2 TBSP water
- 1 tsp neutral-flavored oil (vegetable, rice bran, canola, etc)
- 1.1 lb red bean paste (anko)
- In a large bowl, combine eggs, sugar, and honey and whisk well until the mixture becomes fluffy.
- Sift flour and baking powder into the bowl and mix all together. Keep in the fridge to rest for 15 minutes.
- The batter should be slightly smoother now. Stir in 1 TBSP water. Depends on the size of eggs and how accurate your flour measurement is, the water amount may vary but it should be 1-2 TBSP.
- Heat a large non-stick frying pan over medium-low heat (close to low). It’s best to take your time and heat slowly. I keep the heat setting to the lowest for 5 minutes. Dip a paper towel in vegetable oil and coat the bottom of the pan with the oil. Then remove the oil completely (that’s the key for evenly golden brown dorayaki surface). With a ladle or a small measuring cup (I use a 4 TBSP measuring cup), pour 3 TBSP of the batter from 3” above the pan to create 3” diameter pancakes.
- When you see the surface of the batter starting to bubble, flip over and cook the other side. With my stovetop and frying pan, it takes 1 minute and 15-30 seconds to cook one side and 20-30 seconds on the other side. Transfer to a plate and cover up with a damp towel to prevent from drying. You do not need to oil the pan again. Continue making pancakes (you can make about 12 pancakes).
- Make sandwich with red bean paste. Put more red bean paste in the center so the shape of dorayaki will be curved (middle part should be thicker). Wrap dorayaki with plastic wrap until ready to serve.
- The leftover can be wrapped in plastic and stored in a cool place for 2 days. They also can be put in a freezer bag and stored in the freezer for a month.